
Rental Module Setup
This article will explain everything you need to set up before you can rent units in Lizzy.
Make sure you have a Rental Department:
The first thing you will need to do is make sure you have a rental department set up. To do this, go to Settings->General->Departments and you will see the screen shown below.
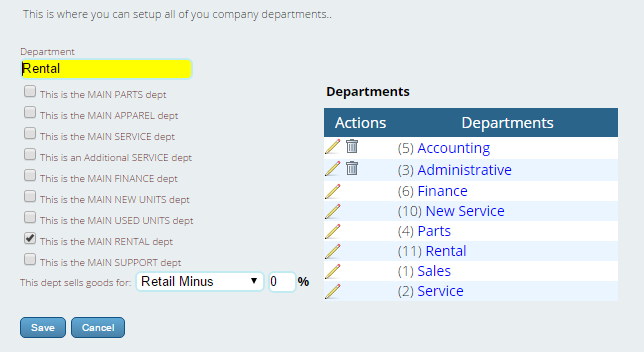
If you see a department named “Rental” or something similar, click the pencil next to it and make sure that “This is the main RENTAL dept” is checked. If it is not checked, then check it and click “Save”. If it is not present at all, then type “Rental” into the text box, check the aforementioned check box, and then click the “Save” button. For more details on setting up and configuring departments, please see the video under Train Me->Lizzy 1,2,3… For Getting Started->Setting Up Departments.
Setting up Hours of Operation:
The next thing you will need to do is set up the hours of operation for your Rental Department. To do this, go to Settings->General->Hours of Operation and select your Rental Department from the drop-down. You will then see this control…

What to do here is best explained by example. If you rent out units all year round, and the hours you are open and renting units remain the same throughout the year, then you would enter whatever name you want (such as “Year-Round’) in the “Name” field, select January as the “Start Month” and December as the “End Month”, “1 hour” as the “Time Slot Duration” and then click the green plus. If you were only open for rentals during the summer, you might enter June and September as the Start and End Months, respectively.
Now, if your hours of operation where rentals are concerned changes depending on the time of year, then you will want to set up multiple time periods here for each portion of the calendar year where your rental hours differ.
Once you have at least one time period defined, you will see a new control appear.
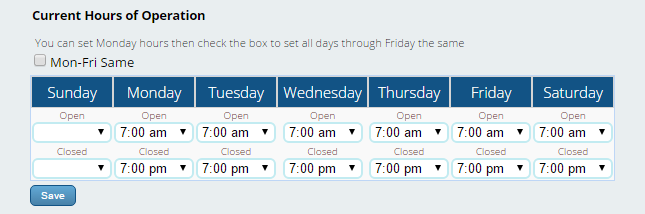
This is fairly self-explanatory. Simply set your opening and closing time for each day of the week. Note that checking the “Mon-Fri Same” box will copy the times you set for Monday to the rest of the days, excluding Saturday and Sunday.
Also note that if you defined more than one time period earlier, you can choose which one you are setting the hours for by clicking the radio button next to it.
Defining Rental Periods:
Now you will need to do is define your rental periods; the increments of time which you rent units out at. To do this, go to Settings->Serialized Items->Rental Periods. There, you will see the table shown below.
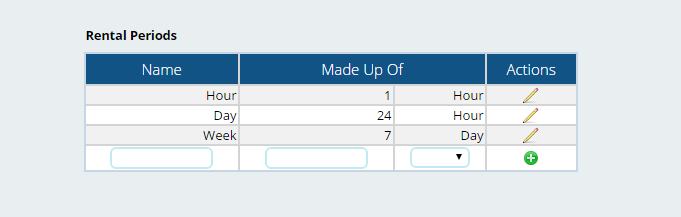
To define a new rental period you need to enter a name for it in the first column, and then in the second and third columns tell Lizzy how many increments of time it is made up of and what increments of time it is made up of. For example, the predefined period “Day” is made up of 24 Hours. If you wanted to create a new period “Business Day” and have that comprised of 8 Hours, you would enter “Business Day” in the first field, “8” in the second field, and select “Hour” from the drop-down in the third field. Then, to finalize your addition, you would click the green plus.
Once you have defined a rental period, you can use it in turn to set up other periods, such as a “Business Week” comprised of 5 Business Days. You can also edit an existing period with the pencil icon, or delete it with the trash can icon. Note however that for the two predefined periods, “Hour” and “Day”, you can ONLY change their name. Also, once a period is USED, it can no longer be deleted, only edited.
Depreciating Rental Units:
Lizzy gives you the option to have the value (cost) of your rental units automatically depreciate each time they are rented. If you wish to have her do this, go to Settings->Serialized Items->Defaults. At the top of the screen, you will see a drop down where you can set the account you want Lizzy to hit when the rental units depreciate, and the percentage of their cost you wish them to depreciate by.

Entering Rental Units and Setting Up Rental Rates:
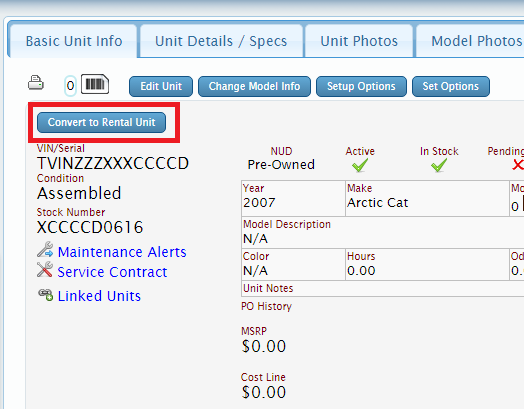
Entering rental units into Lizzy is extremely simple. Any new or pre-owned unit in Lizzy, regardless of how it came into the system (purchase order, trade-in, etc), can be converted to a rental unit simply by looking it up via Serialized->Units->Locate and clicking the “Convert to Rental Unit” button. (Note: At any point you can convert a rental unit to a used unit by clicking the “Convert to Pre-Owned Unit” button.)
Once you have done this, you can edit the unit and set up your rental rates for that model number.
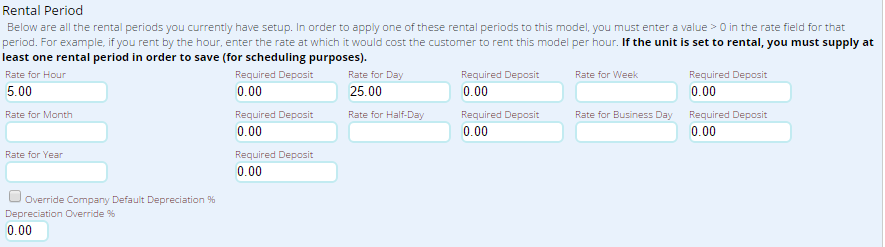
As you can see, there will be a field here for you to enter the charge for each rental period that you defined earlier. Note that whatever rates you enter here will carry over to all other units of the same model number. So to set/change rental rates for all your rental units of a given model number, you only have to edit the rates in one of them and it will carry over to the rest.
Here you can also override your rental depriciation settings. If you wish to do this, simply check the box and enter the percentage you wish them to depriciate by.
Now you are ready to rent some units!